
In this post I’d like to show you how I ported an Azure Classic Cloud Service application (which cost me $16 USD a month by the way) to a .NET Core Azure Function, and now host it in Azure for $0 a month! That’s right - Azure Functions are both awesome and (usually) free!
Introducing realDonaldTron
So back in late 2016, when our dear leader was elected president, I decided to have a little fun at his expense. I created a Twitter account and generated API keys. I then created an Azure Classic Cloud Service and wrote a quick and dirty Twitter bot. This bot consumes 1000s of the most recent tweets from Donald Trump, cleans up his grammar and punctuation a little (because he can’t write words good), generates a Markov Chain from the Tweets, and then schedules a .NET Timer to generate and publish a new Tweet at the top of every hour.
Here’s what the startup code roughly looked like:
|
|
However, I was getting a little tired of paying $16 a month to host it as an Azure Classic Cloud Service. Given my thrifty nature combined with my interest in building my first .NET Core application, I thought a great first step would be to port realDonaldTron over. And so I did!
Porting .NET to .NET Core
Porting a .NET application over to .NET Core is usually not too terrible. I found the easiest way was to create a new .NET Core solution using Visual Studio, drag and drop my directory structure over to my new directory, install all of the NuGet packages that I needed in my old solution (many will have a netstandard specific version for .NET Core), and then attempt to compile and correct errors, Googling (or Stack Overflowing) for new APIs where old calls no longer existed. I needed to make very few changes to realDonaldTron in order to get him working.
I was also pleasantly surprised at how simple the new .csproj file structure is. By default, everything in the folder is included in the project except where you specify exceptions. This makes for a pretty clean file. Here’s the .NET Core realDonaldTron .csproj file:
|
|
A welcomed change from the million line csproj files of past… and the Git conflicts when checking in code! So frustrating.
Hosting in Azure: Don’t use WebJobs
Since I had ported realDonaldTron over as a console application, the right click –> publish dialog in Visual Studio immediately told me to publish it to Azure as a WebJob in an AppService context. Heck, there’s even a free tier - no cost to me! This seemed as if it solved all of my problems, but I soon learned why this was a bad plan.
WebJobs time out
Azure WebJobs are a way to run a service, such as a command line application, within the context of a web application. This web application comes with the built-in IIS 20 minute time-out. This means that if you have a service running as a WebJob, and nobody is hitting the URL at which it has been published (don’t worry, Azure generates a cute little web page for you if your WebJob has no web page of its own), then the application pool spins down, taking your service down with it.
For me, this manifested as my application sometimes working soon after I published it (if I had published it with 20 minutes or less before the next hour), other times not working at all (if I had published it in minutes 1 - 40 of an hour), and regardless it would never publish another Tweet beyond the first 20 minutes.
Always On isn’t cheap
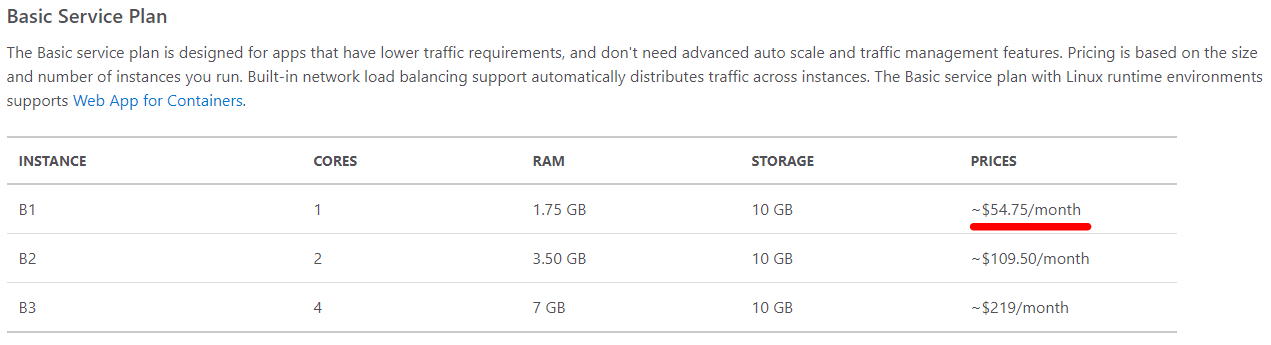
I Googled my little heart out but could not find much useful documentation on Azure WebJobs. It wasn’t until I started exploring the App Service settings in the Azure Portal that I realized I needed to have the Always On feature configured (which disables the IIS timeout). But guess what - you can’t turn that on for the lowest two tiers of App Services (free and shared) - you must pay for at least a Basic plan.

No Always On for you!
And did I mention that Basic plans start at $55 USD per month (assuming Always On and therefore running 24 / 7)?
I'm not paying that!
WebJobs for web sites
So while WebJobs are a great option for websites, and App Services can be free or cheap for website hosting (since they will lazy-load whenever someone makes the first request after the 20 minute idle), I realized one important fact:
WebJobs should NEVER be used for services that need to run continuously and/or always be on.
And with that I began Googling Azure alternatives for command line services… Enter Azure Functions.
Hosting in Azure: Use Azure Functions
Disclaimer: nobody is paying me to talk about Azure or Azure Functions here (though they should). With that said, Azure Functions are awesome.
Pricing
Here’s the thing about Azure Functions: you pay based on consumption in two ways: total executions, and gigabyte seconds (GB-s). These are defined confusingly:
Functions are billed based on observed resource consumption measured in gigabyte seconds (GB-s). Observed resource consumption is calculated by multiplying average memory size in gigabytes by the time in milliseconds it takes to execute the function. Memory used by a function is measured by rounding up to the nearest 128 MB, up to the maximum memory size of 1,536 MB, with execution time calculated by rounding up to the nearest 1 ms. The minimum execution time and memory for a single function execution is 100 ms and 128 mb respectively.
While these pricing calculations are confusing, it’s not that hard to decipher them. Basically, a really quick execution of an Azure Function (like a “Hello World”) will cost:
(100 ms / 1000 ms) * (128 MB RAM / 1024 MB) = 0.0125 GB-s
Multiplying that by the cost per GB-s gets you your cost per execution:
0.0125 GB-s * $0.000016/GB-s = $0.0000002
Which is far less than a single penny.
In fact, you could execute your “Hello, World” function 50,000 times before it would cost you $0.01!
Monthly free grants!
But these crazy cost calculations are not even a concern for most of your and my use cases! Azure Functions pricing includes super generous free grants per month: 1 million executions and 400,000 GB-s!

Azure Functions pricing
Basically, you’d have to run your application 1,000,001 times or for 400,001 GB-s in a month to even begin to see charges to your Azure account.
What does realDonaldTron cost?
realDonaldTron runs at about 30 seconds per execution, once per hour, so my calculation is:
30 seconds * 24 runs per day * 31 days in a month * 0.125 GB RAM used = 2,790 GB-s per month.
This is of course WAY less than the 400,000 GB-s I get for free every month, so realDonaldTron runs for free!
Pretty awesome, right? Basically: you’re gonna be hosting all of your Azure Functions for free - JACKPOT. And even if you somehow go over the limits, Azure Functions are stupid cheap.
A caveat about Azure Function logging
Note that if you use any of the Logging features of Azure Functions, you WILL pay a small fee as they are written to Azure Storage. realDonaldTron costs about $0.12 per month in Azure Storage logging - and I happily pay it when compared to the $16 a month of Classic Cloud Service I was running.
But enough about costs, let’s get to the fun stuff - creating the actual Azure Function!
Creating an Azure Function in VS
Start by creating a new Azure Function project in Visual Studio (be sure to update to the latest Visual Studio version). My screenshots below are from VS Community 2017 (the free edition) which I use on my home (non-work) computer for pet projects:
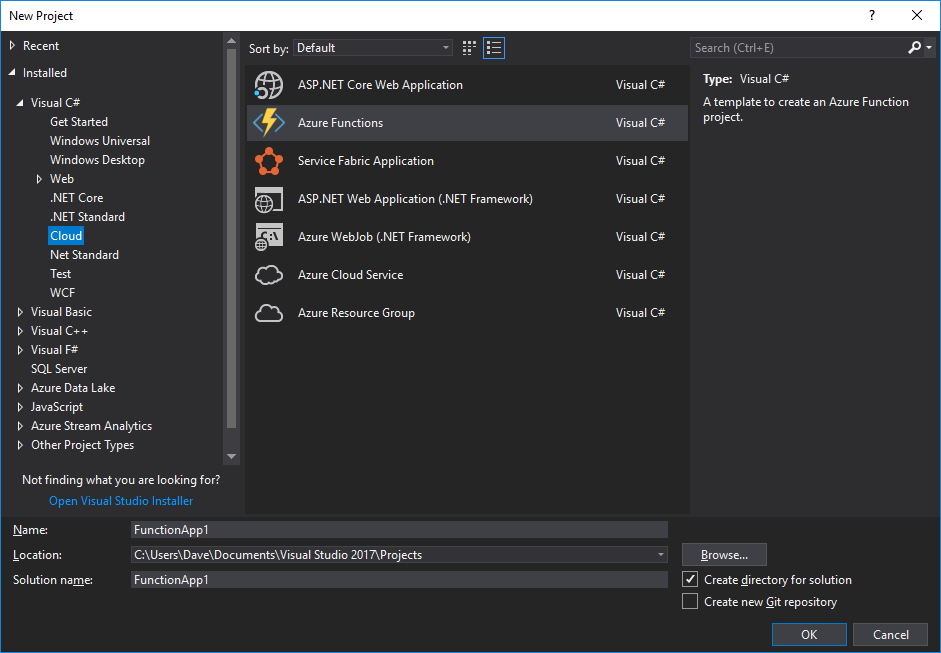
Create an Azure Functions project
On the next screen, make sure you pick Azure Functions v2 (.NET Core) at the top! Azure Functions v1 is for .NET Framework and non-Core apps. I also picked Timer trigger because I want realDonaldTron to run every hour, on the hour:
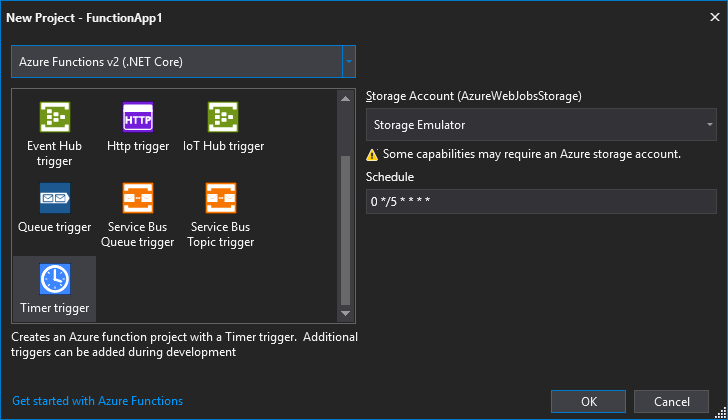
Create an Azure Functions project
Note that the “Schedule” here is a modified CRON syntax. I had a hard time finding good resources for CRON scheduling that actually worked in Azure, but this blog post by Armin Reiter is an awesome cheat sheet that you should definitely use! Also, don’t worry about the schedule in this dialog - you can change it programmatically super easily in a minute or two.
Finish up by pressing OK and next you’ll see this boilerplate code:
|
|
Feel free to change the class name and namespace here - the only important thing to name is the [FunctionName] attribute as this is what will appear in the Azure Portal UI. You can also see that your CRON syntax from the creation dialog is within the [TimerTrigger] attribute here,
and can be readily modified. The ILogger you see there is the logger that goes to Azure Storage and will cost you a few pennies per month. If you’re trying to run truly for free, be sure not to log anything at all.
It’s also worth noting that Azure Functions support async entry method signatures, so async your heart out!
Here’s what my .NET Core Azure Function Run method for realDonaldTron looks like:
|
|
You might notice that all of my Timer stuff is gone. That’s because Azure Functions natively support timed triggers, and the CRON syntax 0 0 * * * * says “run this every hour, on the hour” which completely replaces my need for C# Timers!
Note that unless your function needs to run continuously, you should have it terminate by exiting the Run method as soon as possible. realDonaldTron does not need to remain active - he grabs the latest Tweets and builds a new Markov chain every hour instead. He terminates as
soon as the GenerateTweet() function call returns.
After you’ve written your function, it’s time to publish it to Azure. Simply right click –> Publish your project, to be met with this screen:
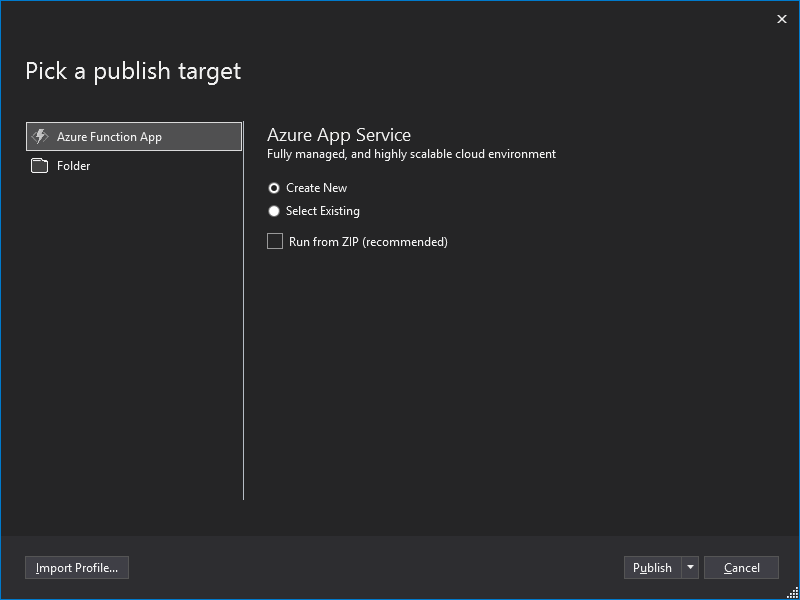
Publish your Azure Function
Press Publish, and on the next screen you’ll need to name your function and set up the various resources it’ll use. The part to pay attention to here is the Hosting Plan which you’ll need to be sure is set to Consumption:
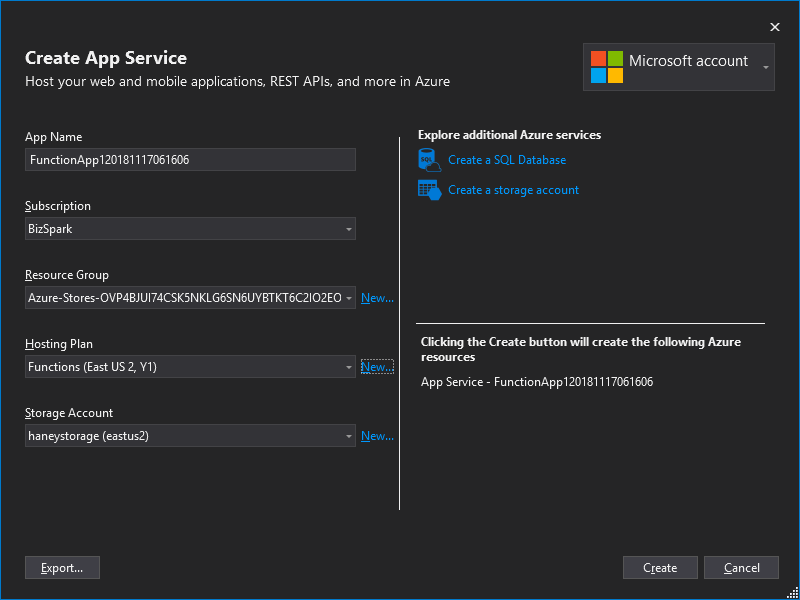
Publish your Azure Function
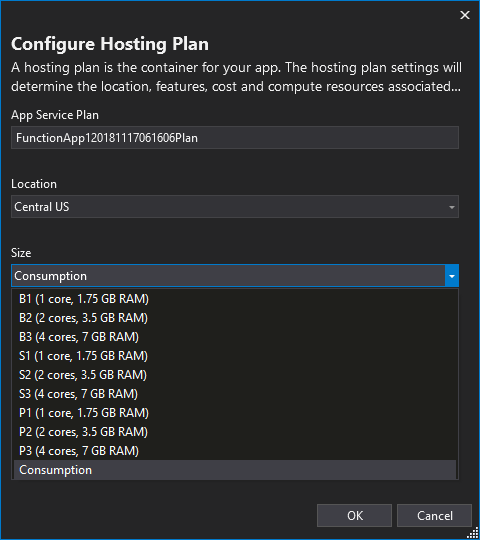
Publish your Azure Function
Follow the steps past this screen and you’ll have your Function published to Azure in mere moments! If you want to test it, but don’t want to wait for the timed trigger, you can visit the Azure Portal and run it manually:
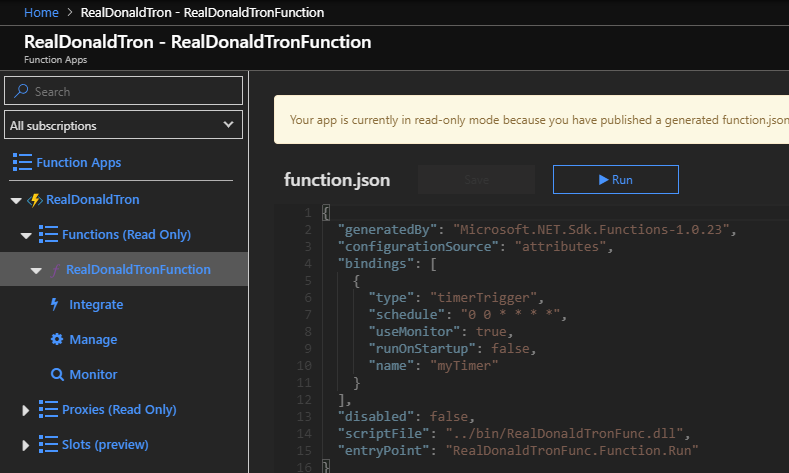
Test your Azure Function
Here your logging will appear in the debug window below for manual runs - it’s quite a nice little tool. If you’ve published a function.json (which you will by default), it will not allow you to edit it here which is fine. Just make local changes and re-publish if needed.
The end result
Thanks to Azure Functions and .NET Core, I now have realDonaldTron running every hour on the hour via CRON scheduling, as an Azure function, well within the monthly free grants provided on Consumption plans. Can you guess on this graph when I converted over to Azure Functions?
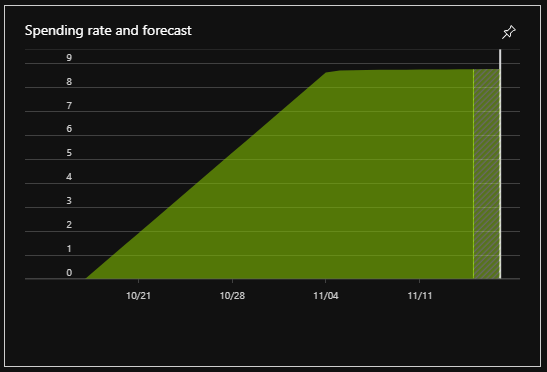
Azure Functions are free, Classic Cloud Services are not
Thanks for reading, and enjoy creating your own easy, cheap, and often free Azure Functions!